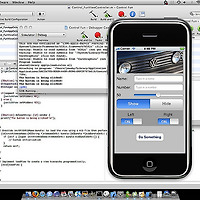
Chapter 4. multiple views - A table with a view
The title of the main viewDisplay drink list
- Declare the drink array. (.h file)
- NSMutableArray* drinks;
- @property ~
- @synthesize ~
- Implement and populate the array. (viewDidLoad method at .m file)
- NSMutableArray* tmpArray = [[NSMutableArray alloc] initWithObjects:@"Firecracker", @"Lemon Drop", @"Mojito", nil];
- Tell the table how many rows you have. (numberOfRowsInSection method at .m file)
- return [self.drinks count];
- Populate the table cells. (cellForRowAtIndexPath method at .m file)
- cell.textLabel.text = [self.drinks objectAtIndex:indexPath.row];
Variable allocation
// 1st Method : Book
NSMutableArray* tmpArray = [[NSMutableArray alloc] initWithObjects:@"Firecracker", @"Lemon Drop", @"Mojito", nil];
self.drinks = tmpArray;
[tmpArray release];
// 2nd Method : MissFlash
self.drinks = [[NSMutableArray alloc] initWithObjects:@"Firecracker", @"Lemon Drop", @"Mojito", nil];
// 3rd Method : Book
NSString* path = [[NSBundle mainBundle] pathForResource:@"DrinkArray" ofType:@"plist"];
NSMutableArray *tmpArray = [[NSMutableArray alloc] initWithContentsOfFile:path];
self.drinks = tmpArray;
[tmpArray release];
Use the navigation controller to switch between views
- A view stack for moving between views
- A navigation bar for buttons and a title
- A navigation toolbar for view-specific buttons
Navigation controllers maintain a stack of views
- Use the tap notification in the table view delegate
- tableview:didSelectRowAtIndexPath
Instantiate a view controller like any other class
- [[DrinkDetailViewController alloc] initWithNibName:@"DrinkDetailViewController" bundle:nil];
- At RootViewController.m
#import "DrinkDetailViewController.h"
...
- (void)tableView:(UITableView *)tableView didSelectRowAtIndexPath:(NSIndexPath *)indexPath {
DrinkDetailViewController *drinkDetailViewController = [[DrinkDetailViewController alloc] initWithNibName:@"DrinkDetailViewController" bundle:nil];
[self.navigationController pushViewController:drinkDetailViewController animated:YES];
[drinkDetailViewController release];
}
Create a back button
Debug process
- First stop on your debugging adventure: the console (Run -> Console)
- Interact with your application while it's running
- And when it's about to stop running
- Xcode supports you after your app breaks, too
- The Xcode debugger shows you the state of your application (Shift-Commander-Y key)
 Steve Jobs for Fortune magazine by tsevis |
'PDA&Mobile' 카테고리의 다른 글
| 아이폰 앱 개발 팁(14) : Programming in Objective-C 2.0 #1 (0) | 2010.08.16 |
|---|---|
| [스크랩] 최강 스펙을 자랑하는 스마트폰, HTC HD2 리뷰 (1) | 2010.07.25 |
| 아이폰 앱 개발 팁(12) : Head First iPhone Development #3 (1) | 2010.03.30 |
| 아이폰 앱 개발 팁(11) : Head First iPhone Development #2 (4) | 2010.03.23 |
| 아이폰 앱 개발 팁(10) : Head First iPhone Development #1 (0) | 2010.03.18 |